Ready to create pro-looking videos? This beginner-friendly guide to video editing techniques covers essential tips – from cutting clips and adding transitions to polishing audio and color – to transform raw footage into an engaging story.
Video editing is where raw footage becomes a compelling story. Have you ever watched a smooth, engaging YouTube vlog or a short film and wondered, “How did they make it all flow so well?” The secret lies in a few fundamental video editing techniques. In this guide, we’ll walk you through the must-know basics of video editing for beginners. By the end, you’ll know how to trim clips like a pro, add tasteful transitions, balance your audio, and even do a bit of color tweaking to give your video a polished look. Let’s dive in!
Plan and Prepare Before You Edit
Before you jump into cutting scenes, a little prep work goes a long way. Choose editing software that’s beginner-friendly – for example, iMovie (Mac) or OpenShot and DaVinci Resolve (which have free versions) are great starting points. Next, organize your footage into folders on your computer. Create a folder for your project and subfolders for raw videos, music, and images. This way, you won’t waste time searching for files mid-edit. Finally, outline your story or goal for the video. Even a simple list of key scenes or beats can guide your editing decisions and ensure the final video has a clear, logical flow.
Pro Tip: If you have a script or storyboard, keep it handy while editing. It’ll remind you of the story you want to tell, so you can cut anything that doesn’t serve that story.
Mastering the Basic Cut (Trimming Clips)
The most fundamental editing skill is cutting and trimming your clips. This means removing mistakes, dead air, or unnecessary footage so that only the good stuff remains. Cutting is simply slicing a video clip to isolate a section, while trimming is adjusting the start or end point of a clip to shorten it. Don’t be afraid to cut out filler words, long pauses, or boring bits – audiences prefer a tight, engaging video over one that drags.
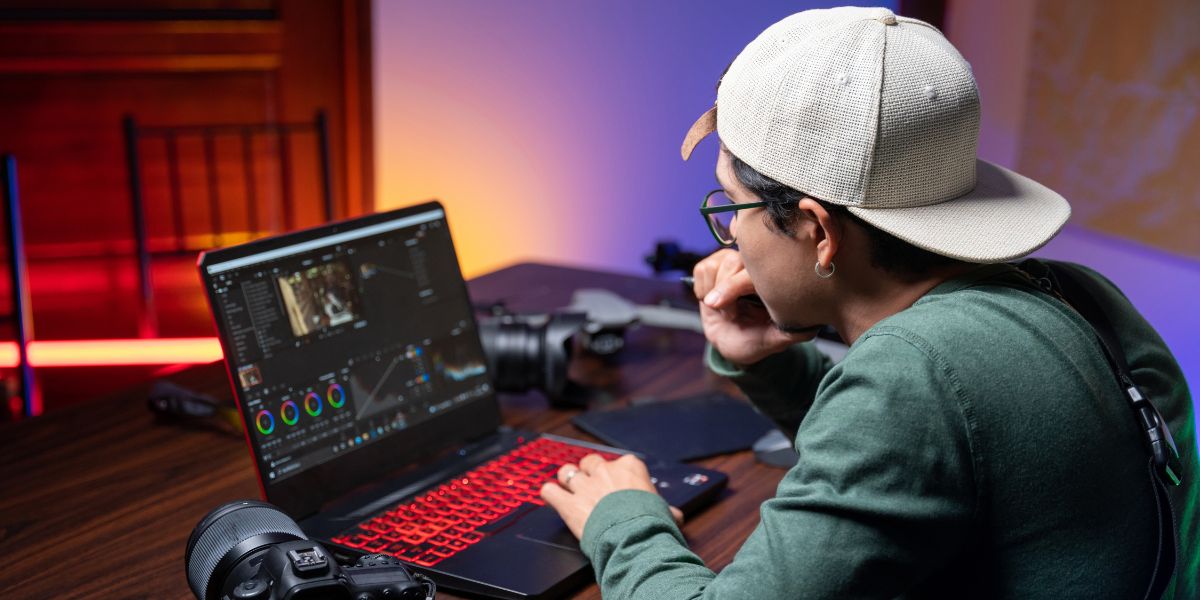
Modern editing software uses a timeline interface (above) where you can sequence clips, trim out unwanted parts, and arrange video and audio tracks. As a beginner, focus on assembling your clips in a logical order and cutting out anything that doesn’t add value to your story.
When arranging clips on the timeline, pay attention to continuity. For example, if two clips were shot at different times, make sure the cut between them doesn’t confuse the viewer. A simple way to maintain continuity is to cut on action – if someone is turning or reaching in one shot, cut at that motion into the next shot to make the transition feel natural. Above all, remember that less is more: it’s better to have a short, cohesive video than a long one filled with rambling footage. As you practice trimming, you’ll develop an instinct for what to keep versus what to cut.
Using Transitions Wisely
Transitions are the effects that help one clip segue into the next. As a beginner, it’s tempting to try every flashy transition available – star wipes, page peels, crazy 3D flips, you name it. But seasoned editors will tell you that simple cuts (no effect at all) and basic fades are often the best choices. Overusing fancy transitions can actually make your video look less professional and distract from your content. The goal is for the viewer to stay immersed in the video, not to notice the editing tricks.
So, which transitions should you use? For most cases, a standard cut (jumping straight to the next clip with no delay) is perfect – it keeps the pace up and doesn’t draw attention. Use a fade or dissolve when you want a gentle transition, like at the end of a scene or to show time passing (for example, fade to black, then fade into the next scene). These smooth fades can signal to the audience that one chapter is ending and another is beginning.
If you do experiment with other transitions, make sure they fit the mood of your video. A quick whip pan transition (where the camera motion blurs into the next shot) can convey energy in a travel vlog or sports video, whereas a simple wipe might be fun for a playful project. Just use them sparingly. A good rule of thumb is to ask: Does this transition enhance the story, or am I just adding it because it looks cool? If it’s the latter, consider sticking to a basic cut.
Quick Tip: One clever way to transition without using built-in effects is by cutting on similar elements. For instance, end one clip on a shot of the round sun and start the next clip on a round object like a ball – the viewer’s eye will be guided by the shape, making the cut feel smooth. This is often called a match cut, and it’s a technique even beginners can try once you get comfortable with simple edits.
The Power of Pacing and Timing
Website development is divided into front-enPacing refers to the speed at which your story unfolds, and it’s largely determined by how long each clip stays on screen and how shots are ordered. Good pacing keeps viewers engaged. If your video lingers too long on a single scene, viewers might get bored; cut too quickly from one scene to the next, and they might feel overwhelmed or confused. The key is finding a rhythm that matches the content of your video.d and back-end. The front end is what users see: layout, colors, buttons, and interactions. This involves HTML for structure, CSS for styling, and JavaScript for functionality.
Think about the mood: a thrilling action sequence or energetic vlog segment can have fast cuts (short clips spliced together quickly) to create excitement and urgency. On the other hand, an emotional or informative segment might benefit from slower cuts (letting clips play a bit longer) so the viewer has time to absorb what’s happening. A common beginner mistake is to keep all clips the same length, which can make the video feel monotonous. Instead, vary your shot lengths intentionally. For example, follow a few quick cuts with a slightly longer shot as a breather, just like how a good song mixes fast and slow beats.
Another aspect of timing is knowing when to cut. Try to cut on action or motion whenever possible – the viewer’s eyes are already moving with the action, so they’re less likely to notice the cut. If there’s no movement, cut on a natural pause in speech or at the end of a sentence or thought. And always watch the edit back to see how it feels. If a part of the video feels too slow, consider trimming it more; if something feels too abrupt, you might need to give it a couple more seconds or add a transition.
Another aspect of timing is knowing when to cut. Try to cut on action or mRemember: As you get more comfortable, you’ll develop a sense of pacing. Don’t be afraid to re-cut a section multiple times to see what timing works best. Editing is an iterative process – even professionals tweak the timing of their cuts over and over to perfect the pacing.otion whenever possible – the viewer’s eyes are already moving with the action, so they’re less likely to notice the cut. If there’s no movement, cut on a natural pause in speech or at the end of a sentence or thought. And always watch the edit back to see how it feels. If a part of the video feels too slow, consider trimming it more; if something feels too abrupt, you might need to give it a couple more seconds or add a transition.
Enhancing Your Video with B-Roll
Ever notice how documentaries or YouTube tutorials cut away to related footage while the narrator keeps talking? That’s B-roll – supplemental footage that isn’t the main subject (the main footage is called A-roll). Using B-roll is a fantastic technique for beginners to make videos more engaging and cover up cuts or edits in the A-roll. For example, imagine you’re editing an interview (A-roll). Instead of just showing the person talking non-stop, you can insert cutaway shots of what they’re talking about – if they mention cooking, show a close-up of chopping vegetables; if they reference a location, show a quick shot of that place. This makes the video visually richer and helps illustrate the story.
B-roll is also a lifesaver for hiding jump cuts. A jump cut happens when you cut out a portion of a clip and join the remaining pieces, causing a jarring “jump” in the image (like a person suddenly changing position or an object appearing/disappearing). By overlaying a B-roll clip exactly during that cut, the jump is hidden – the audience’s attention goes to the B-roll footage while the audio from the main clip continues underneath seamlessly. When the B-roll ends, you cut back to the A-roll and voilà: no one notices that a chunk was removed.
To use B-roll effectively, make sure it’s relevant. If you’re doing a travel vlog, your A-roll might be you narrating to the camera, while B-roll can be scenic shots of the location, local food, or behind-the-scenes moments. If you’re making a tutorial, B-roll can be screen recordings or close-ups of the process you’re explaining. Gather more B-roll footage than you think you need – it’s better to have extra clips to choose from in editing. Over time, you’ll learn which types of cutaways best complement your main footage. Plus, shooting with editing in mind (thinking “this could be great B-roll”) will improve how you plan videos in the future.
Audio Editing Basics: Don’t Forget the Sound
People often say that audio is half the video experience, and it’s absolutely true. Beginners sometimes focus so much on the visuals that they neglect audio quality – but bad audio (like loud background noise or inaudible dialogue) will turn off viewers faster than a slightly shaky camera. The good news is you don’t need to be an audio engineer to dramatically improve your sound. Here are the basic audio editing tasks every beginner should tackle:
Lastly, consider the golden rule of video audio: Viewers will tolerate somewhat grainy or low-quality visuals if the story is great and the audio is clear, but they won’t sit through a video with crystal clear images and terrible sound. So take the time to get your audio right – your audience will thank you.
Adding Titles, Text, and Graphics
Visual text elements like titles, captions, or graphics can add a professional touch and also convey important information. As a beginner, you don’t need to go overboard with crazy motion graphics; start with the basics:
When using text and graphics, consistency is key. Stick to one or two fonts throughout the video (too many fonts can look chaotic). Use the same color scheme or style for all your text elements so your video has a cohesive look. Also, check the safe margins (also called title-safe areas) in your preview – make sure important text isn’t too close to the edges of the frame, or it might get cut off on some screens.
Most importantly, ensure your text adds value. Don’t overload the screen with information; keep it concise. Each time you add text, ask: Does the viewer need this info on screen to better understand or enjoy the video? If yes, add it clearly and legibly. If not, maybe it’s better to leave it out and let the visuals speak for themselves.
Basic Color Correction for a Polished Look
Have you ever noticed how some videos look dull and washed out, while others pop with vivid colors and perfect brightness? A lot of that comes down to color correction and grading. As a beginner, you don’t need to become a color grading expert, but a little tweaking can significantly improve your video’s look and make the different shots in your video feel cohesive.
Color correction is about fixing issues and making the video look natural. Start with the basics in your editor’s color tools: adjust the brightness (exposure) if your footage is too dark or too bright. Tweak the contrast to add a bit more depth – increasing contrast can make colors and edges stand out, but too much will lose detail in shadows/highlights. Check the white balance: if your video looks too blue or too orange, it means the color temperature is off. Many editors have an auto white balance or a temperature slider; use these to make whites actually look white (not bluish or yellowish). This will make skin tones look more realistic too.
After correction, you can explore a bit of color grading, which is adding a style or mood to your video. For instance, a warm golden tint for a sunset scene to enhance coziness, or a slight teal-and-orange look that many travel videos favor for a cinematic feel. Most editing software come with preset “filters” or “LUTs” (Lookup Tables) which apply a certain color style. Feel free to try one or two, but use a light touch – you still want your footage to look natural unless you’re deliberately going for an extreme effect.
One important thing: ensure consistency. If you filmed on different days or with different cameras, clips might vary in color and brightness. When editing, compare clips that sit next to each other. If one scene is noticeably greener or darker than the next, adjust it so the transition isn’t jarring. The viewer shouldn’t feel like the color suddenly changes between shots. A quick method is to pick one of your best-looking clips as a reference, and then color-correct other clips to roughly match that one.
Color adjustments can be intimidating at first, but start simple. Even using the “Auto” color or auto contrast feature (if your software has it) can instantly improve a flat-looking clip. From there, you can fine-tune if needed. As you grow more confident, you might dive deeper into things like RGB curves or creative color grading, but for now, mastering the basics of exposure, white balance, and contrast will make your videos look clean and well-produced.
Final Touches: Review and Export
Once you’ve assembled your video, added transitions, checked pacing, balanced audio, inserted titles, and tweaked colors – it’s time for the final review. Watch your entire video from start to finish as if you’re a viewer seeing it for the first time. Take note of anything that feels off: Is there a weird pause or an abrupt cut? Does any text flash too quickly to read? Is the background music too loud in one section? Pause and fix those issues. This is also the moment to catch little mistakes like a typo in a title or an unintended brief black frame between clips.
It can help to have someone else watch your draft too. A fresh pair of eyes (and ears) might notice things you missed. Don’t be discouraged by feedback – even pros rely on peer review to refine their edits.
After making the final tweaks, ensure you save your project (you should be saving periodically anyway!). Then move on to exporting. In the export or render settings of your editing software, choose a format that balances quality and file size. For most purposes, MP4 format with H.264 codec is a safe bet – it produces a high-quality video that isn’t too large and is widely supported (perfect for YouTube, social media, or sharing with friends). Use the appropriate resolution (e.g., 1920×1080 Full HD is standard if you shot in HD, or 4K if you worked in 4K). Also, double-check the frame rate matches what you shot (common ones are 24 fps, 30 fps, or 60 fps). Many tools have presets like “YouTube 1080p” which will automatically set ideal options.
After exporting, watch the final file to make sure everything looks and sounds as expected. It’s not uncommon to catch one more thing at this stage – if so, you can go back into the editor, fix it, and export again. Once you’re happy with the result, congratulations – you’ve completed your video!
Key Takeaways for Beginner Editors
Story First: Always make editing choices that serve the story or message of your video. Cut out fluff and keep the content meaningful for your audience.
Keep it Smooth: Watch out for jarring jumps in video or audio. Use B-roll, transitions, and audio crossfades to smooth over any rough edges in your edit.
Mind Your Audio: Never underestimate sound quality. Invest time in leveling audio and reducing noise – good audio keeps viewers engaged.
Practice and Experiment: The more you edit, the better you’ll get. Try new techniques on small projects; experience is the best teacher in video editing. Don’t be afraid to experiment and develop your own style!
Conclusion: Start Editing Your Story
Editing transforms raw clips into something special – it’s where your creativity truly comes to life. As a beginner, you now have an arsenal of foundational techniques: cutting, transitions, pacing, audio tweaks, titles, and color correction. Remember that every famous filmmaker or YouTuber once started exactly where you are now, piecing together their first video and learning from each edit.
So fire up your editing program and start crafting your story one cut at a time. With these techniques in hand, you’ll find that each project you finish will look and sound a little better than the last. Happy editing, and don’t forget to enjoy the process! Now, go turn those raw clips into a video you’re proud to share with the world.
Call to Action: Have your own video editing tip or a question about the process? Drop a comment below! We’d love to hear about your experiences as you dive into video editing. And if you found this guide helpful, feel free to share it with fellow aspiring editors. Good luck, and happy creating!